How can we help?
How to setup a Sharp on a new network
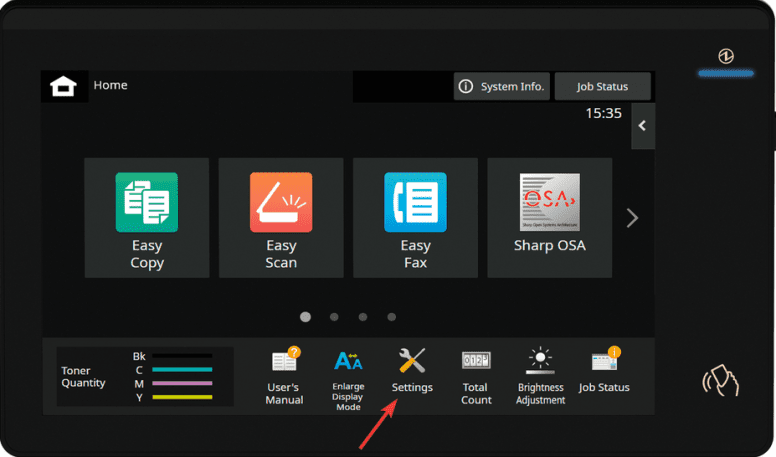
1. From the home screen of the copier press the “Settings” option on the bottom of the screen. Touch the Status tab and Network to retrieve the IP v4 address. Or use our How to Find Your Sharp IP Address guide.
2. On the right select “Administrator login” and input the password and select “Login”. The default password is “admin” if that doesn’t work please contact your IT Administrator.

3. Select the “System Settings” tab at the top, then Network Settings and Quick Setting should already be selected. Scroll down to the “IPv4 Settings” and at the DHCP drop down select enable and then scroll to the top and select “Submit”. The machine will Prompt if you would like to Reboot Now or Reboot Later. Choose Reboot now.
As long as you have the ethernet cable connected and it is plugged into an active port it will pull a new IP address.

4. Go back to step one and follow the instructions to get back into the IPv4 Settings. Change the DHCP setting back to Disable and confirm that the machine keeps the same IP address it had obtained. Touch Submit. Choose Reboot Now.
5. If you currently already have the print driver installed you will need to update the IP address in it. On Mac computers you will need to follow How to Install a Sharp Printer on Mac to reinstall the MFP with a new IP Address to reinstall your driver. On Windows 11 you will use the Search option on your taskbar to open Printers and Scanners. Find your printer and click on it.

6. Choose Printer Properties and go to the Ports tab.


7. Click Add Port. Choose Standard TCP/IP Port and click New Port. It will start a Wizard.


8. Click Next. In the Printer name or IP address type in the newly acquired IP address of your machine and click Next. Continue through the wizard until you can choose Finish.


9. It will go back to the Printer ports box. Click Close then Click Apply in the lower right corner. The printer will be pointed to the new IP address.

