
How can we help?
How to Setup Canon on a Network
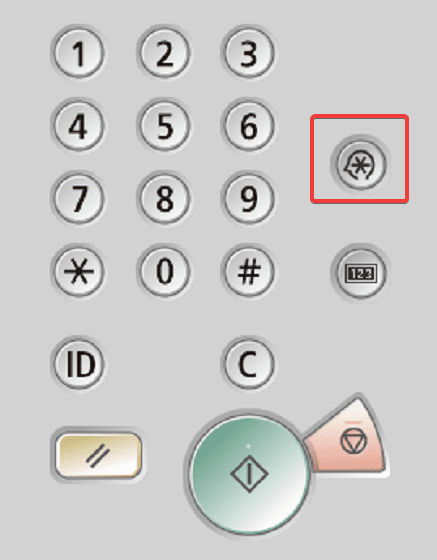
1. Press  (Settings/Registration).
2. Press [Login] default password is 7654321, 1234567 or left blank. If you have a manager ID and pin option use 7654321 for both or reverse the PIN to 1234567.


3.Press [Device Settings].

4. Press [Preferences] → [Network].


5. Press [TCP/IP Settings] → [IPv4 Settings].


6. Press [IP Address Settings]

7. Check the box next to “DHCP” and then press [OK].

8. Power off the copier with the physical power switch, leave it off for 30 seconds, and then turn it back on.

9. When the copier fully comes back on, press the “123” or “Check Counter” button and find the IP address listed at the top of the screen.


10. Take the IP address and type it into the address bar of a new browser tab on your computer.

11. Log into the web portal.
11a. If you have a Manager/Dept ID, the ID is “1234567” and the pin is “7654321” or “1234567”.
11b. If you have a Username/Password, the Username is “Administrator” and the password is either left blank or “7654321”.
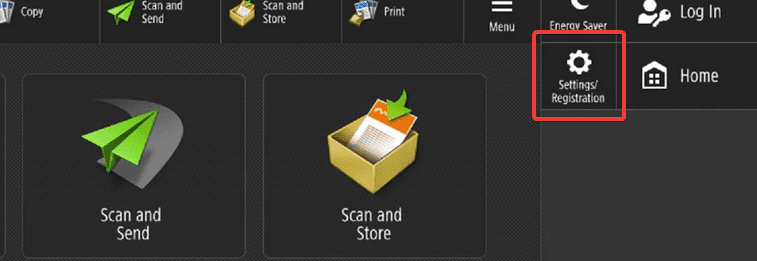
12. Click the “Settings/Registration” link on the right side of the page.

13. Click “Network Settings”. Click “IPv4 Settings”

14. Uncheck the “Use Auto IP” and make sure “ProtocolSelect” is Off. Then make sure the IP address is the same one you got on the copier, and then click “OK”.

15. If you already have the driver loaded on your computer you will need to point it to the newly acquired IP address. If you have a MAC computer you will need to reinstall the driver using the How to Install a Canon Printer on MAC guide. On Windows 11 you will use the Search option on your taskbar to open Printers and Scanners. Find your printer and click on it.

16. Choose Printer Properties and go to the Ports tab.


17. Click Add Port. Choose Standard TCP/IP Port and click New Port. It will start a Wizard.

18. Click Next and enter the newly acquired IP address from the MFP. Click Next and continue through the Wizard until you have the option to click Finish.


19. Click the Close button on the Printer Ports box and then click Apply in the lower right corner. Your PC is now pointed to the new IP address.

