How can we help?
How to Setup an Email Account For The Copier
1. It is recommended to use your company’s mail service for setting up scanning. Free Gmail accounts can be used for testing. Please refer to your company’s scanning policy prior to configuration. Go to the Google account creation page.
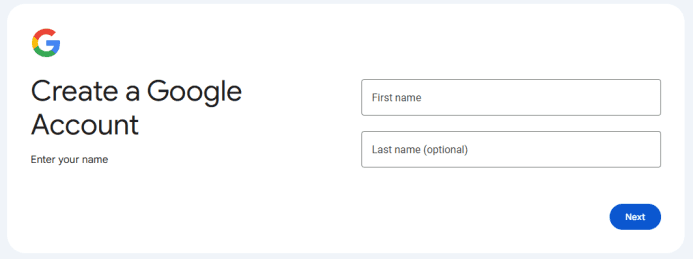
2. Fill out the fields and click “Next”.
3. Fill out the fields with whatever info you want and press “Next”.

4. Create a the email address you want to use. It might take a few tries depending on what is available. Try the numbers of your address or store number for uniqueness.

5. Create a strong password for the account and click “Next”.

6. You will get one of two prompts. One will ask you for a phone number to text for verification, the other will show a QR code to scan and verify.


7. We suggest you add a recovery email to the account in case you forget the password but it is not required. You may get a popup to verify your account first and

8. Once the account is created click “Next.

9. Agree to the terms and then confirm on the pop up window.


10. It will take you to the inbox of the account. Press the color circle in the top right and then press “Manage your Google Account”

11. Press “Security & sign-in” on the left and then “2-Step verification”.

12. Press the option that says Phone Number and enter a cell phone number to be associated with the account.

13. Press +Add phone number. Enter the number and choose Receive codes by text message. Click Next. Click Save to Confirm.


14. Type in the account password to verify and click Next.

15. Select the back arrow and click Turn on 2-Step Verification. Cilck Done on the Popup.


16. Click the back arrow again next to 2-Step Verification

17. In the search bar at the top type in app and select “App passwords” from the list.

18. Name the app password the model of the copier and press “Create”.

19. This is the password you will use for the email account on the copier, it will not be shown again after this so please take note of it. The password will be displayed with spaces between each four letters. However when you enter it into the Copier you will remove those spaces so there are no spaces between the groups of letters.

20. You will get a Google Security Alert Email to the scanner account. Open the email and click Check Activity.

21. Click Yes, it was me. This will keep the account from locking up by verifying it was created by you. Do this for any emails that have come into the inbox for Google Security notices.
